Remote
working : User
documentation Arval
Corporate Version
9

Contents
2.1. For the remote desktop access
2.2. For the remote Centaurus telephony access
2.3. Connection to the personal WIFI
2.4. Public WIFI connection (hotel, restaurant…)
3. First connection (PIN code
creation)
4. Classic connection (with PIN
code), PIN code already set
6.1. The following page appears after you enter your
credentials
7. Connection to your remote
phone
10. How to activate the sound
when you receive a call
This document presents
the required actions to initialize the common use of a remote access with an
ARVAL laptop and how to configurate the phone call transfers from your
Centaurus telephone to another phone (fix or mobile).
2.1. For the remote desktop access
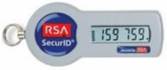
- Have a remote access card (token)
- Have an ARVAL laptop
If you do not have
these tools, you can make a request by filling out the forms available on the
HR Echonet :
http://b2e.group.echonet/index.php?pid=40021
Technical prerequisites
- Access via citrix
with a laptop : 3Mbps
(minimum)
- Access via citrix +
skype video: 5Mbps (minimum)
- Access with your
personal PC (Use Your Own Device) to a Citrix desktop 5Mbps (minimum)
2.2. For the remote Centaurus telephony access
Have a telephone (fix
or mobile)
- For ACD people
(example: account team), Remote phone has to be a landline phone, otherwise
connection times will be too long and
you’ll be disconnected from groups.
- Have the Citrix
Interaction Desktop icon published on your profile
2.3. Connection to the personal WIFI
Working from home, you
must be connected to your personal Wifi
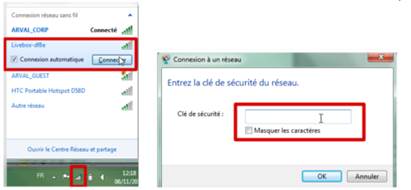
When WIFI connection
is established, refer to steps 3 “First connection (PIN code creation)” and 4
“Classic connection (with PIN code), PIN code already set” of this document.
2.4. Public WIFI connection (hotel, restaurant…)
If you work from a
public hotspot (WIFI), you should activate McAfee firewall Timed Groups
(Internet access will be allowed for 10 minutes) to be able to reach logon
page:
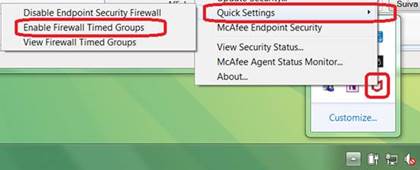
Launch « Internet
Explorer » browser and type https://access.arval.com/
The home page is
displayed like below:
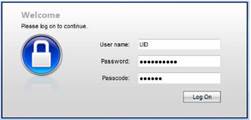
In the 3 fields,
specify the following informations:
User Name : enter your UID (6 characters)
Password : enter your Windows session password (the
same as you use to start Windows in the morning)
Passcode : enter the 6 digits shown on your card
(token). This will indeed ask you to create a PIN.
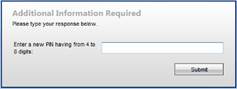
Please enter a
4-digits PIN code in the first popup.
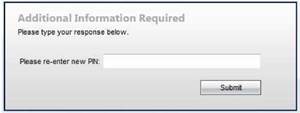
Please re-enter the
same 4-digits PIN code in the second popup.
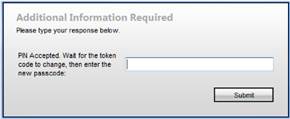
In the third popup,
enter your 4-digits PIN adding the 6 digits of the card. Warning, digits must have changed since the initial
connection.
Then, you must wait
until your remote access interface will be loaded.
The speed of this step
depends on your internet connection. Generally, it
takes 15 minutes.

Once your session
loaded, you arrive on your home page.
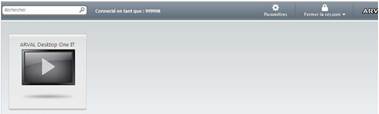
You have to start your
desk to charge your environment.
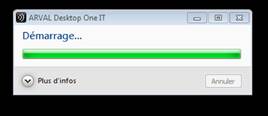
Once you charged your
desktop, you can use it as if you were on the ARVAL network. You can access:
- Your mailbox by
launching Outlook application
Beware, if you want to use archives, you must connect
them. It is imperative that archives be present in your "My Documents" folder.
- Directories networks
where you have access
You must go into
"ARVAL Folder" on your desktop.
- Applications that will run in Citrix mode
You will find an
"Applications" folder on the desktop for that.
Launch this website https://access.arval.com/ and fill all 3 fields as follow:

User Name : enter your UID (6 characters)
Password : enter your Windows
session password (the same as you use to start Windows in the morning) Passcode : enter 10 digits as follow: 4 digits of PIN code + the 6 digits shown
on your card (token).
Next steps are identical.
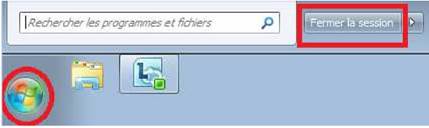
After each session,
you must log out in order to properly restore your computer to conventional
configuration. You must logoff of your Citrix desktop by clicking the Windows
button at the bottom left and select Logoff button.
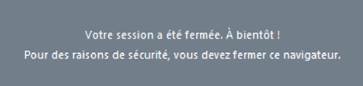
Then, you have to log
off the Internet page which has helped us to connect by clicking on Logoff button in the upper right.

The following message
tells you that your session is closed properly.
6.1. The following page appears after you enter your credentials
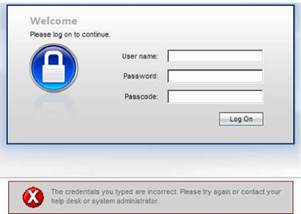
This error indicates
that the entered information are not correct. Make sure you are not mistaken
password and your PIN code is correct.
Warning,
after 5 attempts, your access will be disabled.
If you are not able to connect.
Please contact the Hotline on 01 57
69 56 56.
6.2. Loss PIN code
If you don’t remember
your PIN code. You need to contact Hotline (01 57 69 56 56) to reset card.
6.3. Loss of your card
In this case, contact
the Hotline (01 57 69 56 56) to disable your card. A replacement card
will be provided the following days.
6.4. Password modification
Be careful, it is
important to anticipate the end of your session password (every 90 days).
Indeed, you will be
unable to proceed of password modification on remote access. You must call the Hotline (01 57 69 56 56)
to changes your session password.
It’s best to
anticipate this change and will not wait for the last moment to change your
session password.
6.5. Antivirus
Your remote access is
linked to your antivirus. Indeed, it is necessary that the last update was
recently at least two weeks. Otherwise, remote access will not work.
Please note that the
antivirus is updated at each connection and this even in remote access.
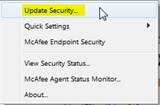
Note that you can update your antivirus
yourself with your own internet connection. You have to open your session on
the laptop and connect it on internet (with a cable or on your Wi-Fi), then right-click
on the shield icon and select the Update Policy option ![]() .
.
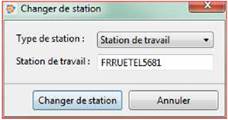
Launch your telephony
application « Interaction Desktop »
Click on your current
phone name, bottom left
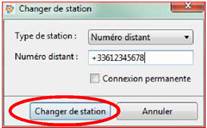
The window « Changer
de station » will be displayed :
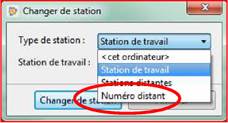
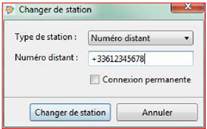
Click on “Type de station/ Station Type” & choose “Numéro distant/Remote number”
Enter the number of
your remote phone international format
Make sure the box «
connexion permanente » is cleared
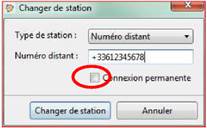
Validate the change by
clicking on « Changer de station ».
Make your phone call
from your application, as usual :
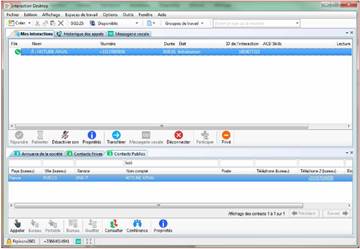
You will see it
initializing
Your remote phone will
ring, you will be able to answer it
The call will be
launched from your remote phone

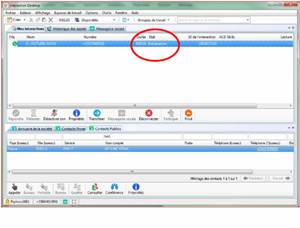
You’ll see the call from your application – By
default there is no sound

Your remote phone will
ring, you will be able to answer it

The call will be
launched from your remote phone

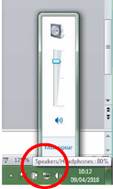
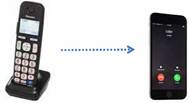
Go in your telephony application
« Interaction Desktop », tab « Options », then « Configuration ».
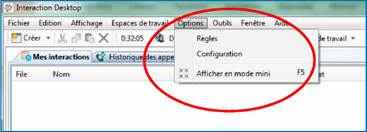
Enable your computer
to ring By selecting Alert and tick the box
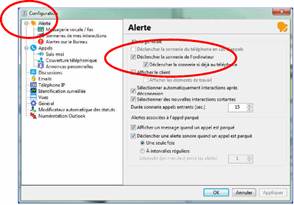
Check that the sound
is enable on your workstation